Users of SentiSight.ai are able to train a variety of image recognition models of their choice, but deploying these models correctly can often be a tricky decision. At SentiSight.ai we are offering three options to use the model you have trained:
- Via our web interface
- Via the online cloud-based REST API server
- Using the downloaded model via offline REST API server which you can set up on your local device.
In this post we are going to guide you through their differences, pros and cons of each choice and a short introduction to their setup.
Creating great customer experience helps us to improve

We strive for ultimate customer satisfaction, and so it is our mission to learn from our customers’ needs and implement features that aid workflow flexibility and adaptability. It is important for us to offer our users as much freedom of choice and alternative means of deploying the models to keep up with an ever evolving AI landscape and to stay ahead of the competition by offering our clients the most up to date and easy to use AI platform.
We pride ourselves in being able to offer a convenient and easy to use platform that provides in-depth performance statistics and various complexity options. Experienced users may opt for setting up their own servers with our AI platform integration, while beginners are finding our web interface to be very comfortable to learn on.
Advantages and disadvantages of different SentiSight.ai model deployment options

What differentiates the options for deploying your model is variations in their simplicity, ability to automate, speed and pricing.
Below we go through the advantages and disadvantages of each of the three options to deploy SentiSight.ai models:
- Web interface
- Cloud-based REST API server
- Offline REST API server
1. Web interface
While you will need to perform detection requests manually, the web interface is perfect for quick testing. It is possible to view the predictions on the web interface itself and also to download the prediction results as a .csv or .json file.
You can also download images grouped into folders by the predicted label, which might be useful if, for example, you are a photographer and you want to sort your photos. When deciding to opt for the web platform, you will be presented with a simplistic user-friendly interface that still offers thorough statistics for more advanced users.
Using the model via our web interface allows for a quick and easy test implementation of a new model, however, rendering the results may take some time so this option works slightly slower than the REST API options. Plus, the process of making new predictions cannot be automated.
2. Cloud-based REST API server
The second option to deploy SentiSight.ai models is via cloud-based REST API. The major advantage of such deployment is that it is very easy to integrate it into any app or software that you are developing.
The idea is that the user still uses the web interface to train the model, but once it is trained they can send REST API requests to our server and get the model predictions as the responses. The REST API request must include an image to be predicted, project id and model name to be used. We provide code samples to form these REST API requests.
Using the model via a cloud-based REST API is easy to set up, requests can be sent from any operating system, even mobile phones, and it does not require any additional hardware. Moreover, the trained model’s predictions can be automated and the only requirement is that the client device is connected to the Internet.
3. Offline REST API server
The third option is to deploy the SentiSight.ai model as an offline REST API server. For this, you need to download the offline version of SentiSight.ai model and launch it on your own server.
The server needs to run a Linux operating system and in some cases it requires a GPU to reach the maximum speed. Once the server is launched, the client can send REST API requests to this local server.
The client devices don’t have to be connected to the Internet, they only need to be on the same local network as the server. In principle, it is even possible to run the client on the same device as the server, so the model could run completely offline. On the other hand, if the client runs on a different device, it has very low requirements for computational power and it can run on any operating system, because all it needs to do is to send a REST API request to the server.
Offline SentiSight.ai models come in three different speed modes: “slow”, “medium” and “fast”. The price of an offline model license depends on the required speed. GPU hardware is required to reach the maximum “fast” speed for classification models and to reach “medium” and “fast” speed for object detection models. The slower speed modes do not require a GPU. Also, the image similarity search model does not require a GPU for any of the speed limits. One of the major advantages of the offline SentiSight models is that if they are set up correctly and run on “fast” speed mode, they are faster than the cloud-based REST API, because the image does not have to travel via the Internet.
It is worth noting that the offline server can also run on a Linux virtual machine that runs on Windows. However, in our experience it might be complicated or perhaps not even possible to configure GPU drivers to run correctly on Linux virtual machines. On the other hand, if you are running the model in “slow” mode or using a similarity search model that does not require a GPU to reach maximum speed, the virtual Linux environment might be a reasonable option.
Finally, one more consideration when choosing between the online and offline options for deployment is pricing. When you are making predictions either via web interface or via the cloud-based REST API, you have to pay for each prediction (provided you’ve used up all of your free monthly credits).
On the other hand, when you buy a license for an offline model, you need to pay a one time fee and you can use it as much as you want. Offline SentiSight.ai models also have a 30-day free trial version. You can download this free trial and test the integration into your system. Please, note that the free trial always runs on “slow” speed mode and requires internet connection for the server. To learn more about the speed options and licence types for offline models, please, visit our pricing page.
How to deploy SentiSight.ai models
Web interface
The first option is to use the model via our web interface. Very useful for beginners who do not have much technical knowledge and everyone who wants the quickest way to make new predictions, this option does not require any additional preparation. You can simply select a model from the Trained models drop down list and click on Make a new prediction.

Cloud-based REST API server
The second option is to use the model via our cloud-based REST API server. It requires a minimal amount of preparation and technical knowledge, however, it is still easy to use and can be set up quickly.
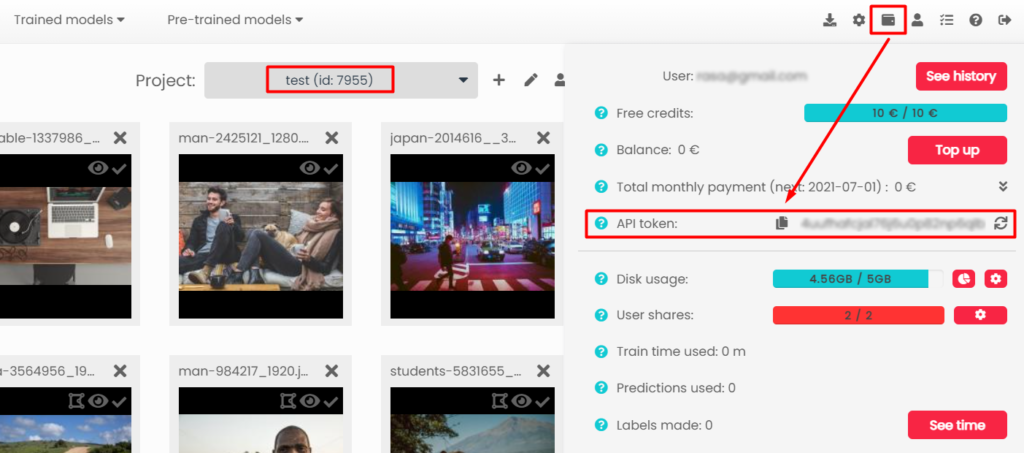
To begin the process you will need your Model name that is visible under the Trained models tab, your Project ID centered below the top menu and the API token located under your Wallet icon:

After collecting all the relevant data you can access the server’s end of communication channel via this link to use the model with the lowest validation error:
https://platform.sentisight.ai/api/predict/{your_project_id}/{your_model_name}/
Or this one, if you wish to use your last model saved:
https://platform.sentisight.ai/api/predict/{your_project_id}/{your_model_name}/last
Now you are able to send requests with your images to the cloud-based REST API server and receive predictions for them. When using the model via this option, you can use any programming language of your choice and to make the startup easier we have provided some code samples for popular interfaces, such as cURL, Java, JavaScript, Python and C# in our user guide. Moreover, we have introduced SentiSight.ai REST API Swagger specification where you can test the service interactively and export code samples for many different programming languages.
Offline REST API server
The third option is to set up the REST API server on your local device, download the model you have trained and use it offline. It requires both technical knowledge, a license and suitable hardware to reach its maximum speed.
To set up the REST API server on your local device you have to download the model from its statistics tab:
After the model is downloaded we suggest to follow the quickstart instructions that you can find in QUICKSTART_GUIDE.html file located in the doc folder. The basic server setup is very simple, all you need is two commands: one to launch our license daemon and another one to launch the server.
After this, you can immediately start sending REST API requests to the local server. For more information, consult README.html. You can also find code samples for sending requests in several different languages in the SAMPLES.html file.
Conclusion
Choosing the suitable option for you mainly depends on your resources, required speed and automation level, as well as technical knowledge. If you wish to quickly test a new model’s performance with an easy setup, then web interface is the best choice. For a relatively easy setup and an option for an automated process without requiring GPU hardware, yet having constant internet connection, our cloud-based REST API server will suit you well.
Lastly, a correctly set up local REST API server can provide the best model’s performance, automation and can be used completely offline, however, the setup requires a Linux operating system. The local REST API server also requires a GPU to achieve maximum speed for all models except for similarity search, for which the maximum speed can be reached on CPU-only devices.
Please take the opportunity to contact us for any further questions so you can deploy your trained model effectively. There are plenty of industries that already benefit from image recognition models, such as, agriculture, retail, and defect detection. We’d like to help you create new models for any application you deem necessary!

