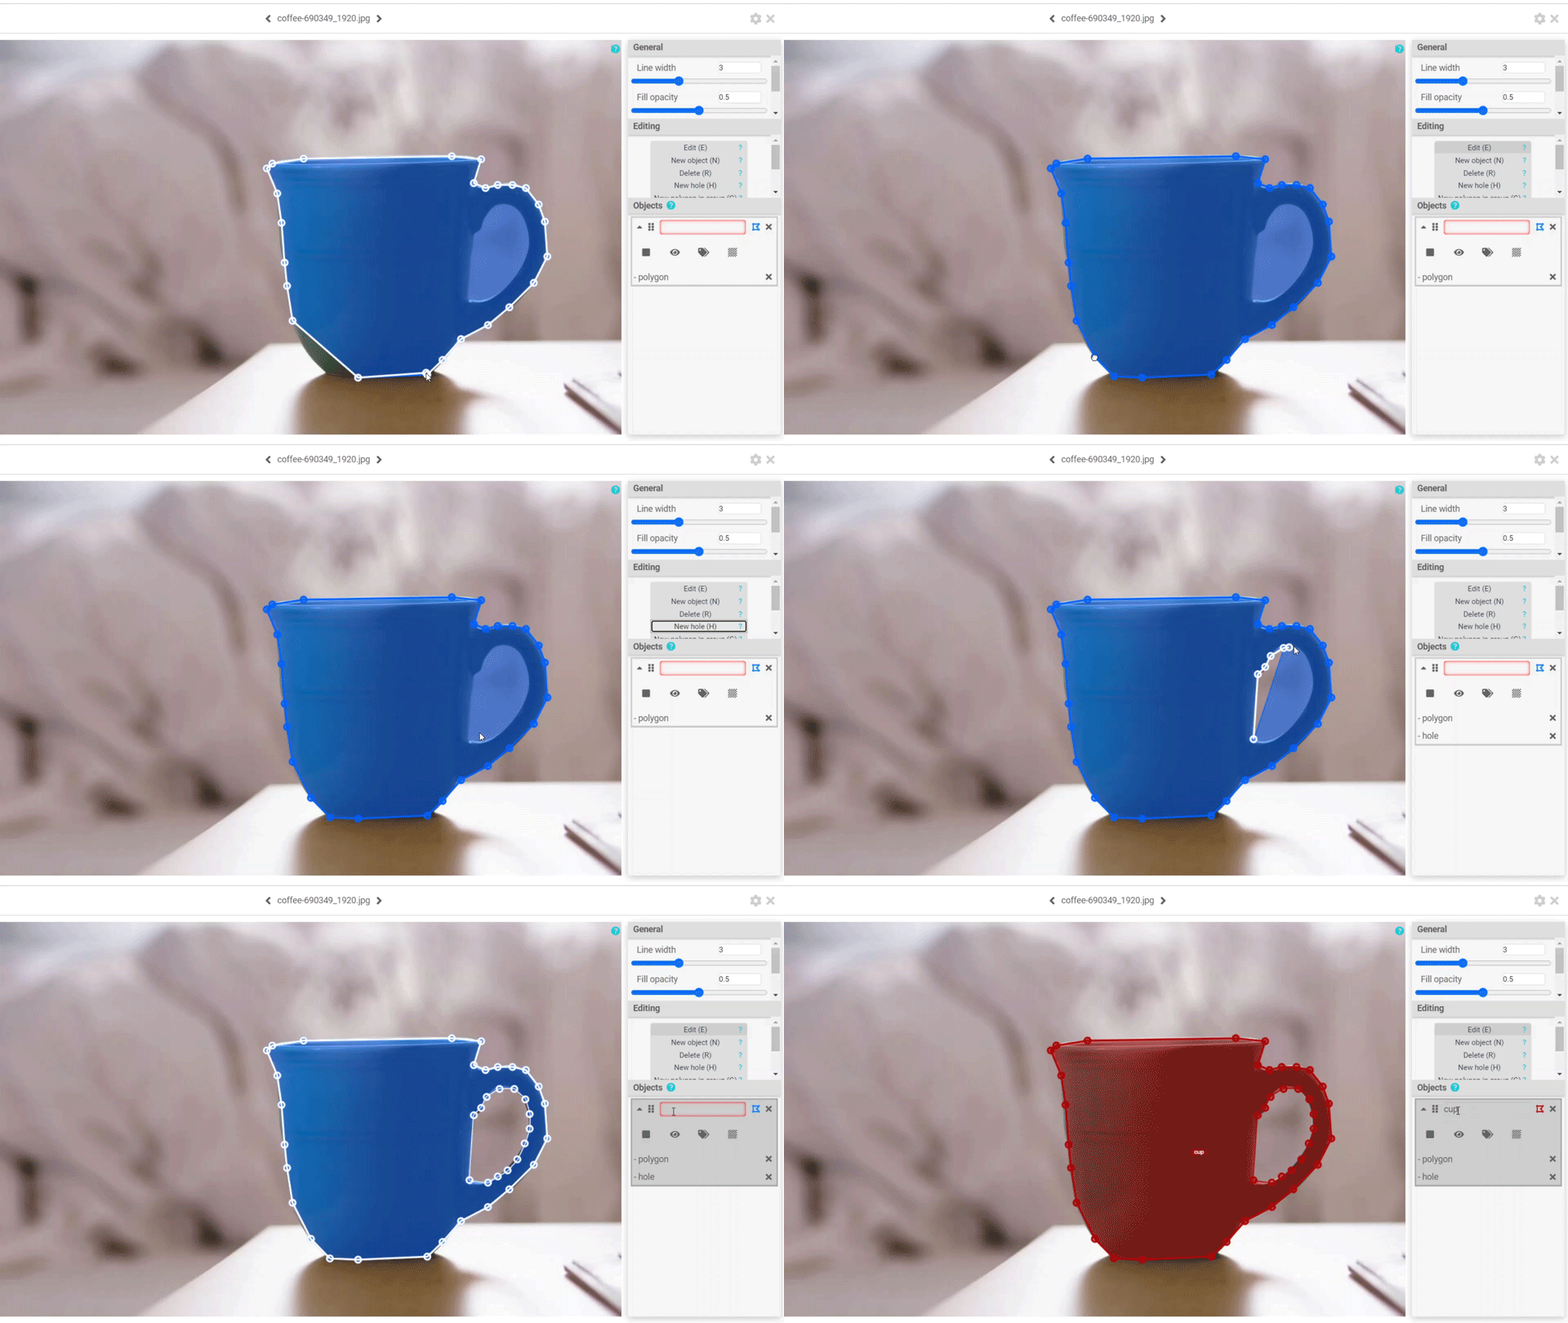
Image labeling, also commonly known as image annotation, is one of the most important processes when working in the Artificial Intelligence field. It is the stepping stone of supervised machine learning, providing the needed learning materials for the models to be trained on.
According to AI-oriented analyst firm Cognilytica, it is estimated that approximatelly 80% of machine learning project time is spent on collecting, cleaning, labeling, and augmenting model data, labeling taking up 25% of that time. Most companies cannot afford spending so much time on tedious manual work, and so they are always on the lookout for optimisation to their workflow.
In regards to this, SentiSight.ai is offering a featured dashboard that makes not only the labeling process more efficient, but also acts as a manager for your labelling staff as well. Today we are going to walk you through what to keep in mind when working on a large scale project and making the most of our labeling tool.
Uploading your images
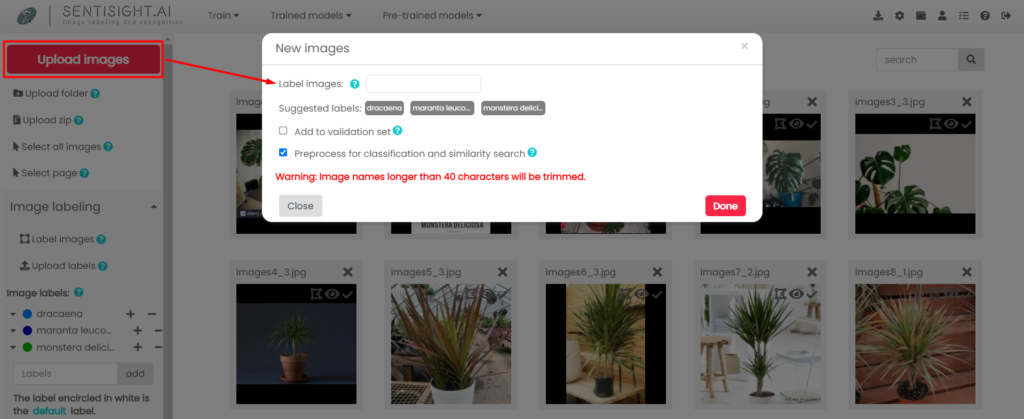
You begin the labeling process by uploading data to your account from the menu on the left. Whether you are uploading all images at once or one at a time, you are able to choose the initial classification labels, add images to the validation set and preprocess for classification and similarity search to make the image recognition models work faster in case you need them in the future.
By right-clicking on the image, you will be able to access some of the quick-action features, such as image rotation, similarity search or the labeling tool. While some of them will make sure your data has the right size and label, the image status features, such as marking the data as seen and unseen, will prove their worth when working on the same project with the rest of your team.
Image labeling tool
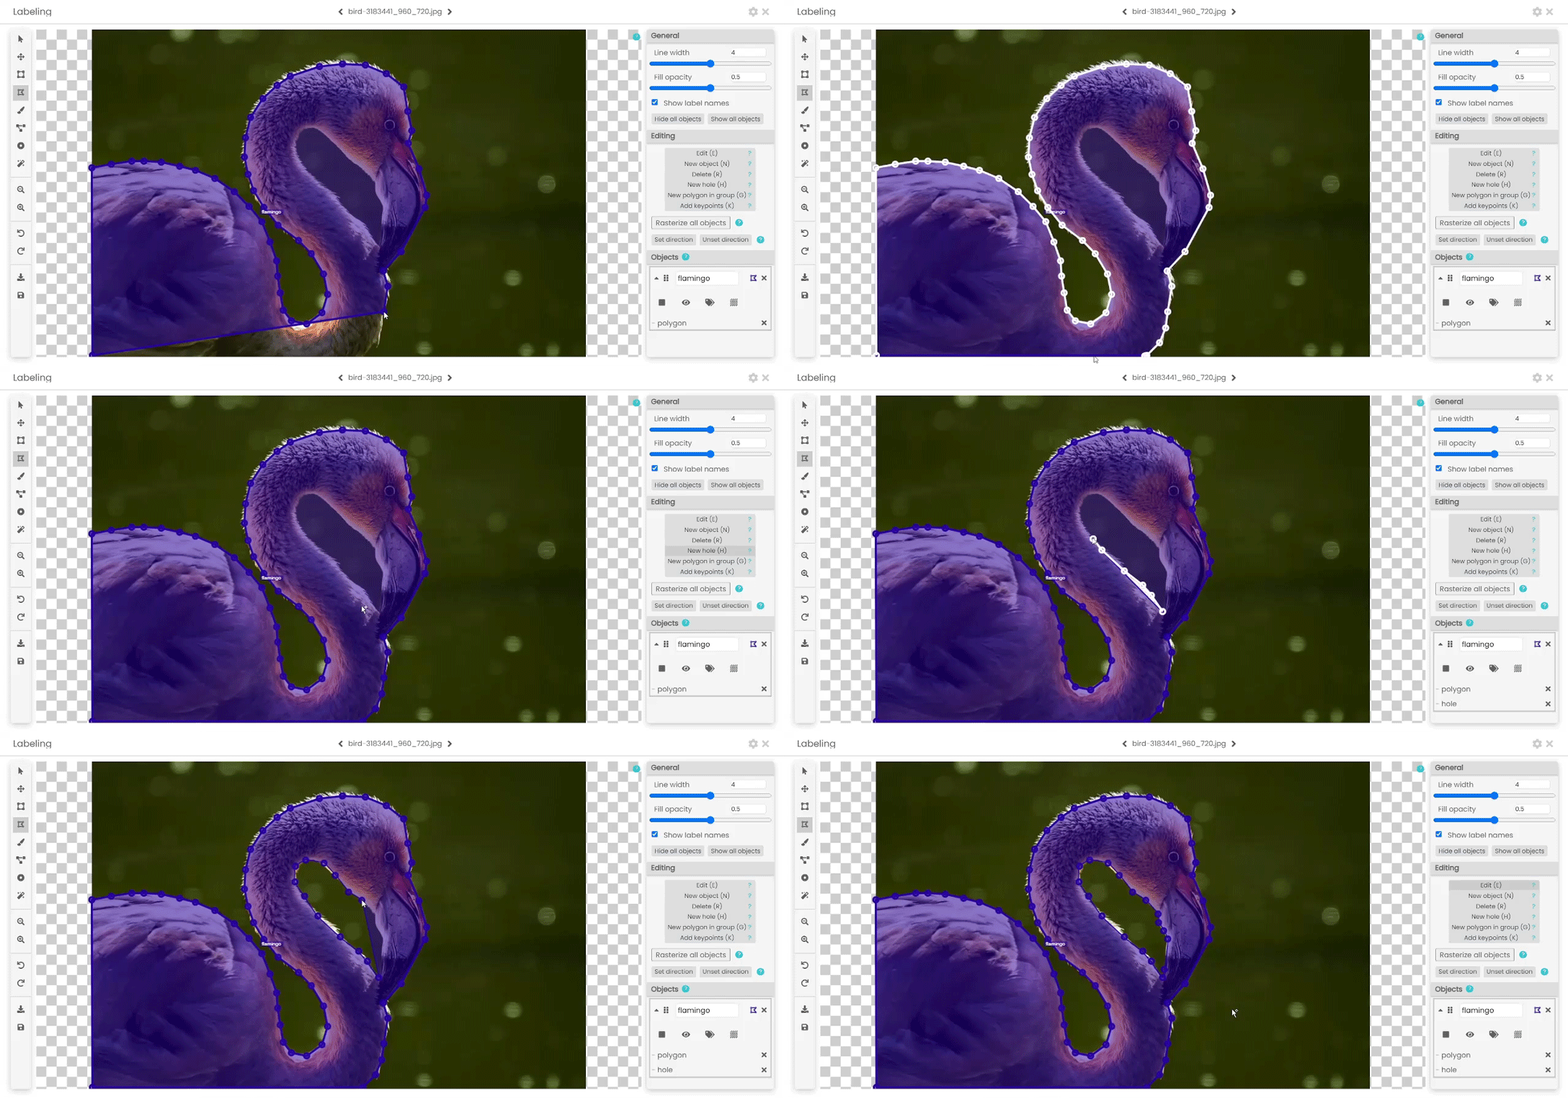
After accessing the image labeling tool you will be presented with a wide variety of annotation instrument choices with their keyboard shortcuts specified between the brackets:
- Bounding box (B). The most popular form of labeling, commonly used to annotate images before utilizing them in training an object detection model. After applying the rectangular bounding box to an object, you are able to mark its most important key points, such as human joints or facial features.
- Polygon (P). A labeling form allowing you to curve around corners by adding and manipulating the anchor points. Very useful for marking objects of a complicated shape, occluded objects as well as carving holes inside objects.
- Bitmap (J). A free-form labeling tool that allows you to cover an object by drawing on it, then converting it to a polygon if needed.
- Polyline (L). Similar to the polygon option, this tool can be used via manipulating anchor points. The differentiation from polygon is that in polyline the first and the last point can’t be connected, so it does not mark an area.
- Point (T). This tool is used to label small objects. You can change the representation of a point to either a circle or a cross.
- Smart labeling tool (M). The smart labeling tool is designed to speed up bitmap labeling. The algorithm behind it automatically extracts the object from the selected foreground and background areas.
Further information about these tools can be found in our article Image annotation with SentiSight.ai, which will help you choose the most suitable one for your project.
Recently, we have introduced a new feature for setting the direction on both polygon and bitmap labeled items, allowing you to mark the object’s angle.
Project management with SentiSight.ai
To train a model properly, you need to prepare large amounts of data which usually requires a lot of time and manual work. This may lead to mislabeled or unlabeled images and other errors in your dataset.
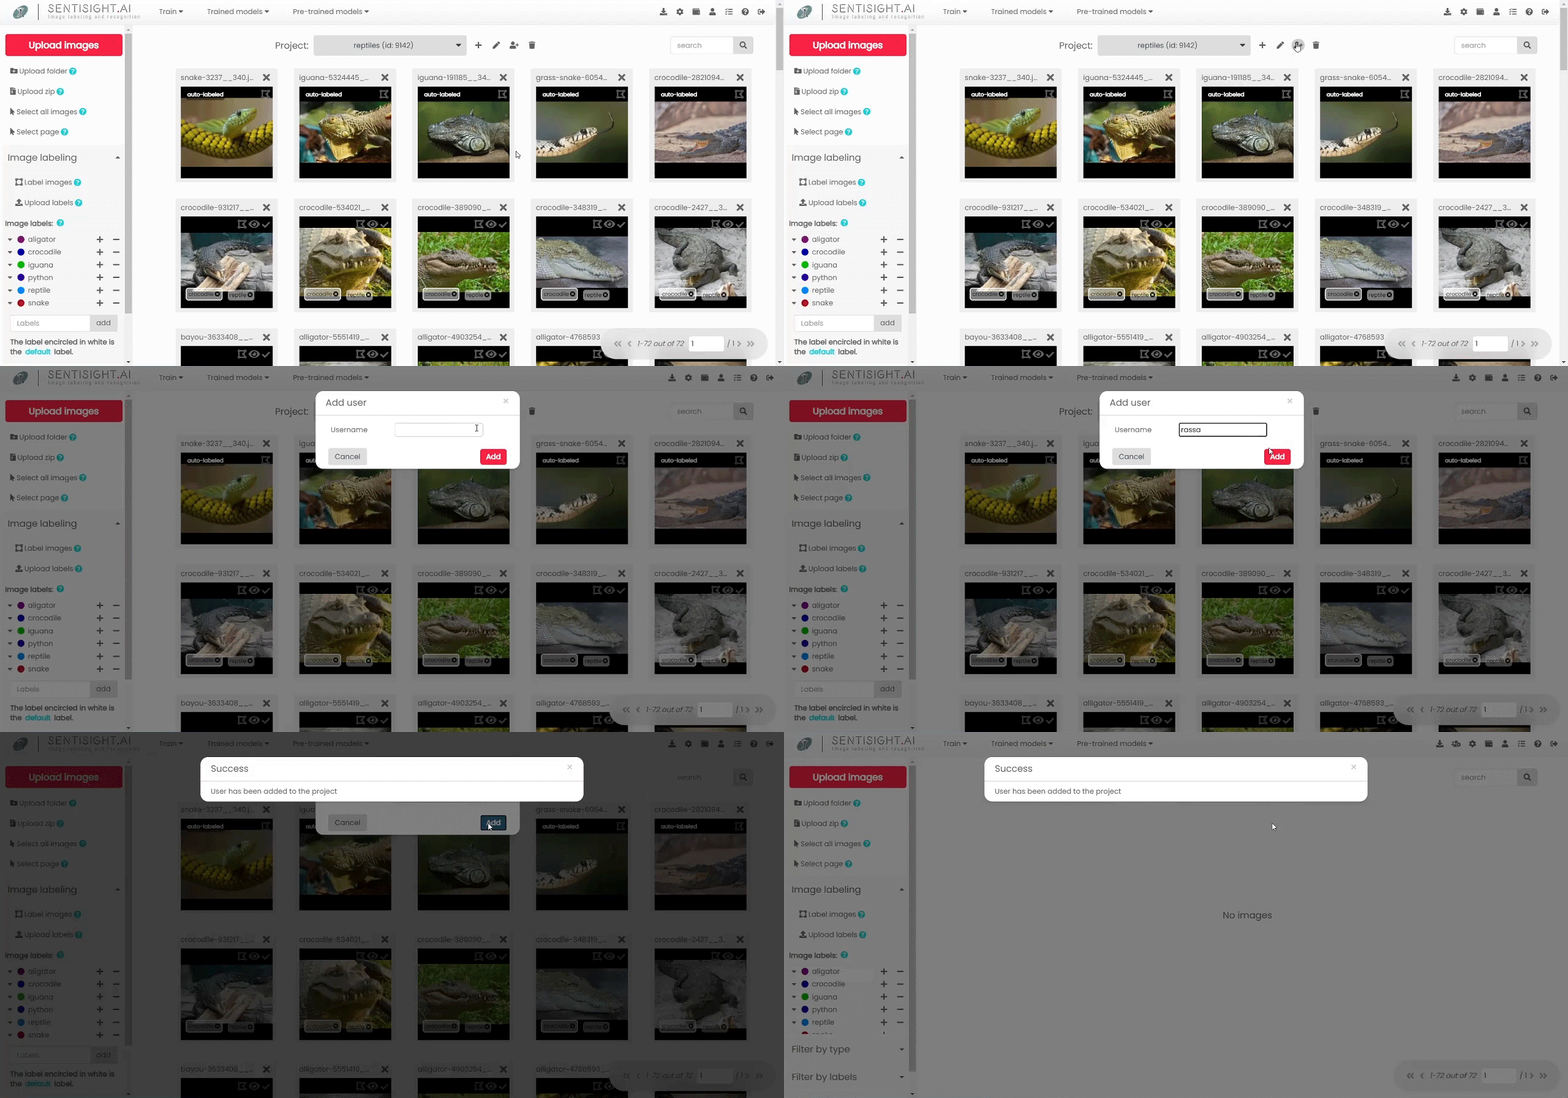
In order to overcome this, SentiSight.ai is offering a project sharing feature allowing multiple users to work on the same project while being able to track their time completing specific tasks and sorting their work accordingly.
To get started, navigate to the main project’s dashboard, select the Share project icon, add a registered user(s)’s email address to the project and start working on it together.
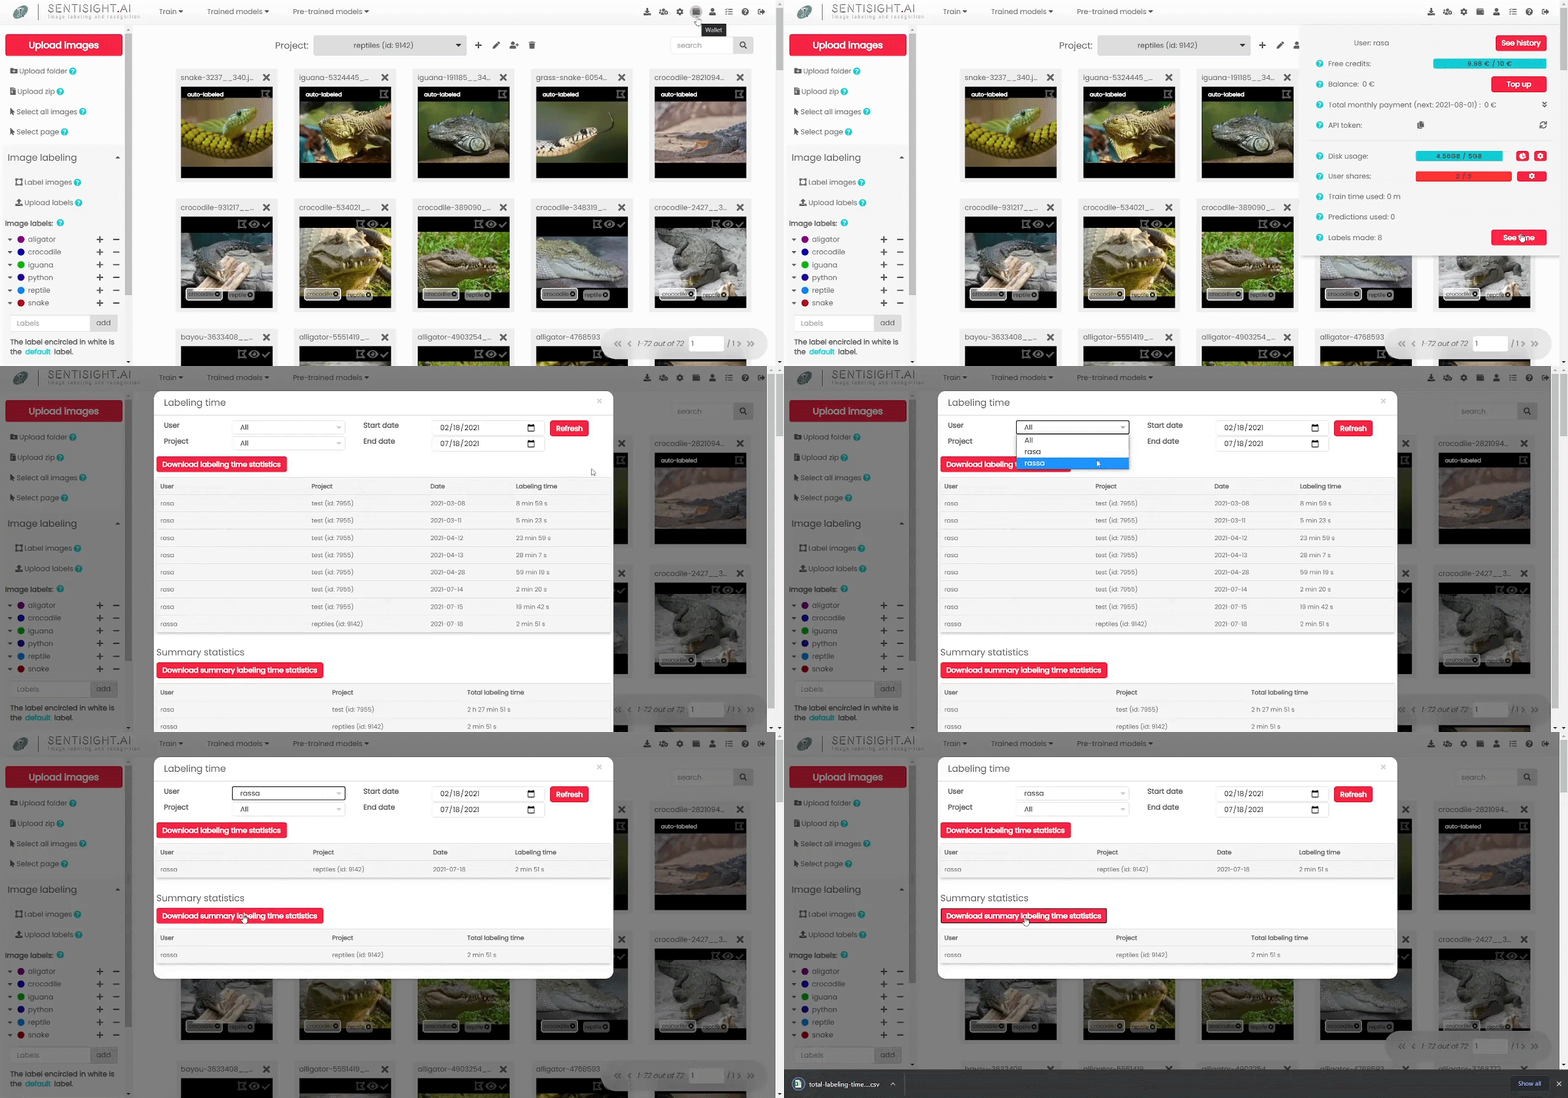
The limit on how many users you can add to a project can be found under the Wallet information.
Through the Settings section, a user is able to choose whether or not the images uploaded and being labeled by another member are skipped. A feature that will prove its worth for those who need to re-check team members’ work to make sure no errors slip through.
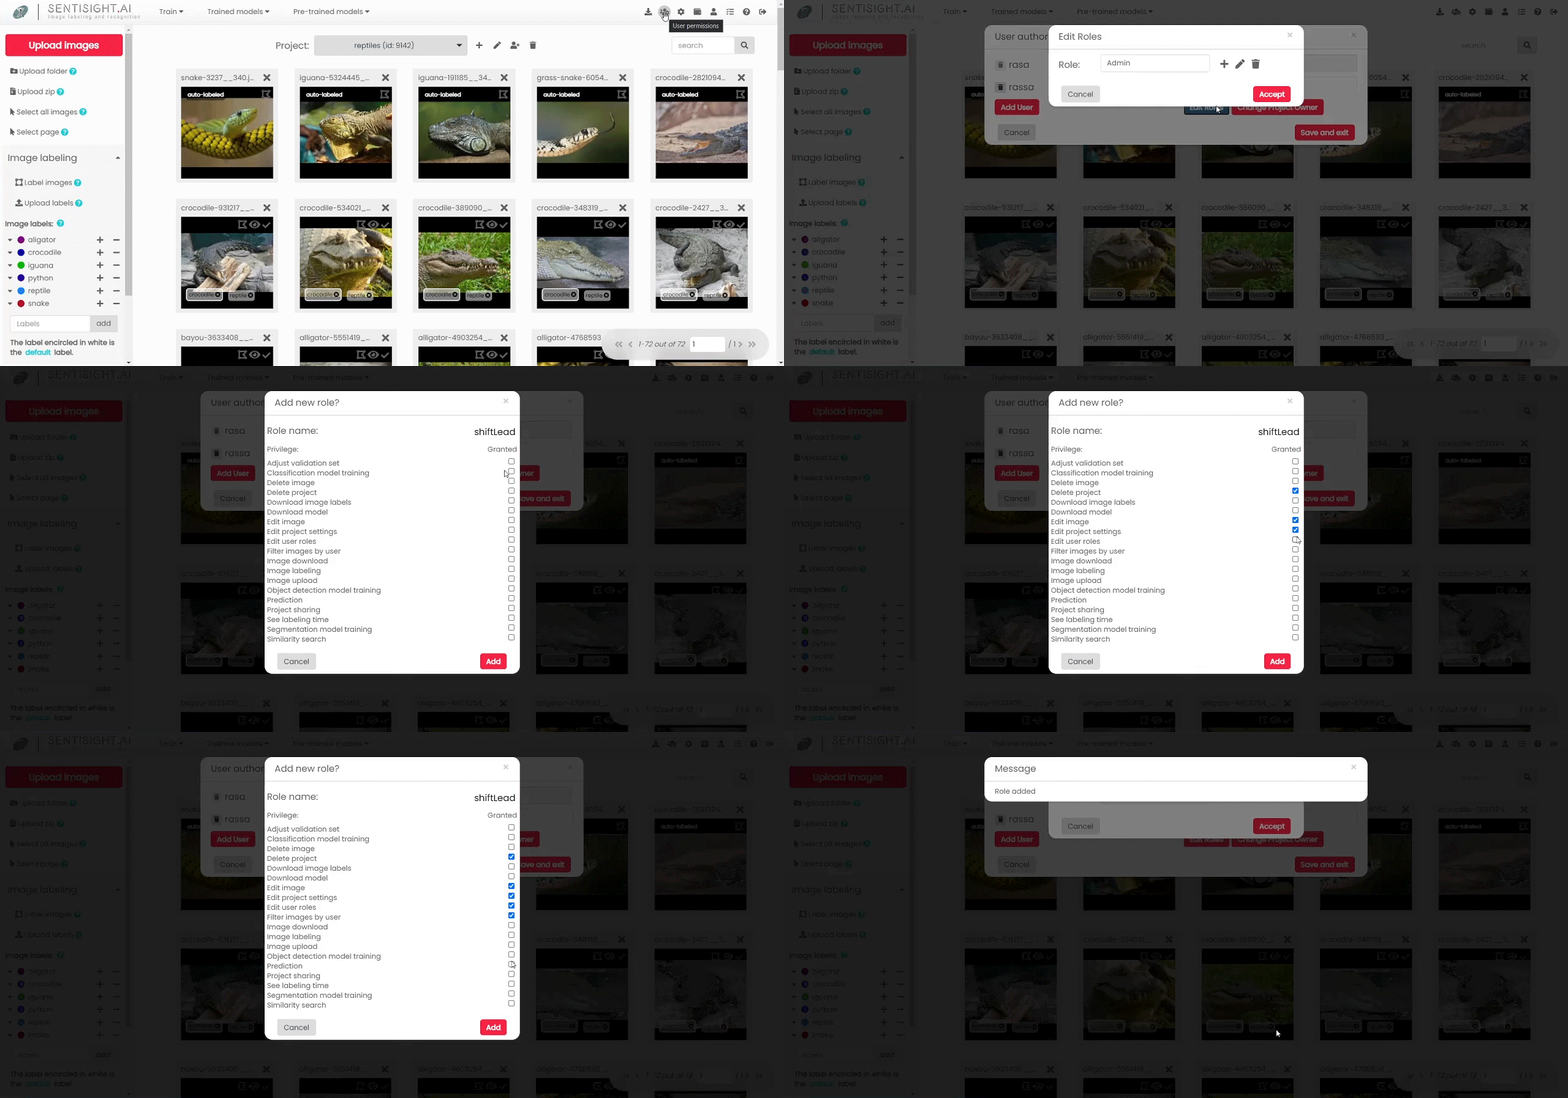
As a project manager, under the User permissions section you will be able to edit your team members’ roles by granting or removing their access to certain features To this day, we have around 20 different access levels that you can use for your newly created roles, being able to create unique selections for each member of your team.
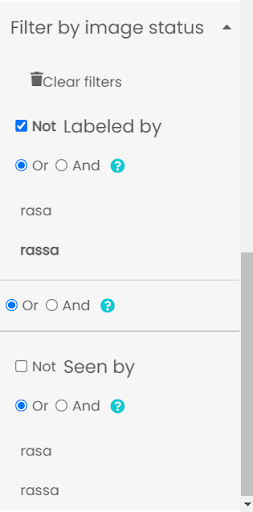
While managing a large team might feel like a challenge, with our SentiSight.ai tools it can be done with ease. You will be able to track your team’s progress with a convenient time management system, filter the dataset by image status, labels and type.
When filtering by user you will be presented with numerous filtering options including:
- Track their contribution to the team,
- See how many images they have seen and/or labeled,
- How much time they have spent on the task;
- Labelers will be able to filter images they have not seen or labeled yet,
- Double-check on their colleagues’ work and track their progress.
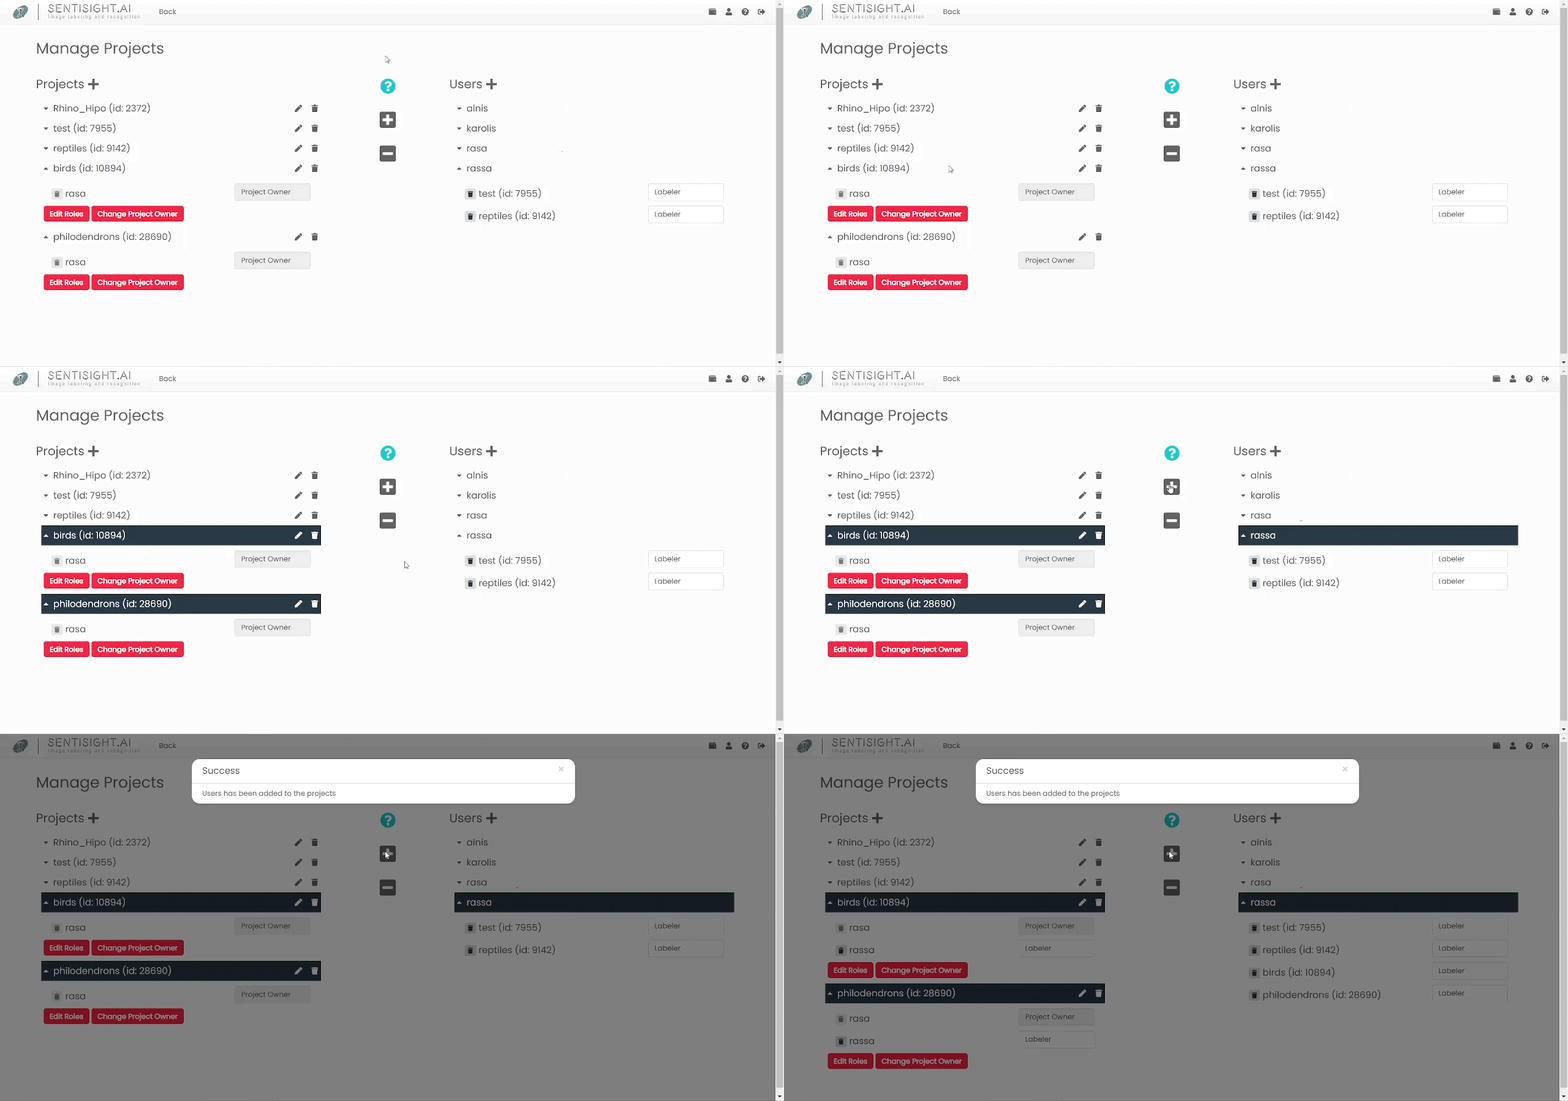
Lastly, we have recently introduced a Project Manager tool allowing for quicker management for projects that greatly simplifies adding or removing users to/from projects, creating or deleting projects and changing users’ permissions. On the left hand side you can see all of your projects while on the right you’ll find all of the users assigned to them. By selecting one or more projects on the left and one or more users on the right, you will be able to quickly add or remove the selected user(s) to/from selected project(s).
Conclusion
Image annotation is a crucial task in a supervised machine learning field leading to training image recognition models. In order to train them properly, large amounts of data need to be collected, cleaned and correctly labeled. While this process requires a lot of time and manpower, SentiSight.ai is offering a labeling tool that will assist you in preparing your dataset as well as tracking the progress of each of your team members.
SentiSight.ai was created having two main goals in mind:
- To make image labelling tasks as efficient as possible, even when working on large scale projects.
- To provide its users with a clean and user-friendly interface for training deep learning models, saving companies precious time and money.
If you have any queries on how our platform can assist you with developing and training your very own image recognition models for various uses, such as retail, then please do not hesitate to contact us and one of our team will get back to you.
